
How to Add a Runner to Self-Hosted GitLab: The Full Walkthrough
Registering a runner against your own GitLab instance, from installing the package to the first green pipeline, including the authentication-token change that broke every older tutorial and the mistakes that cost the most time.
Your self-managed GitLab has no runners, so nothing executes your pipelines. This walks through fixing that properly: installing GitLab Runner, registering it against your instance, choosing an executor, and confirming it actually picks up work.
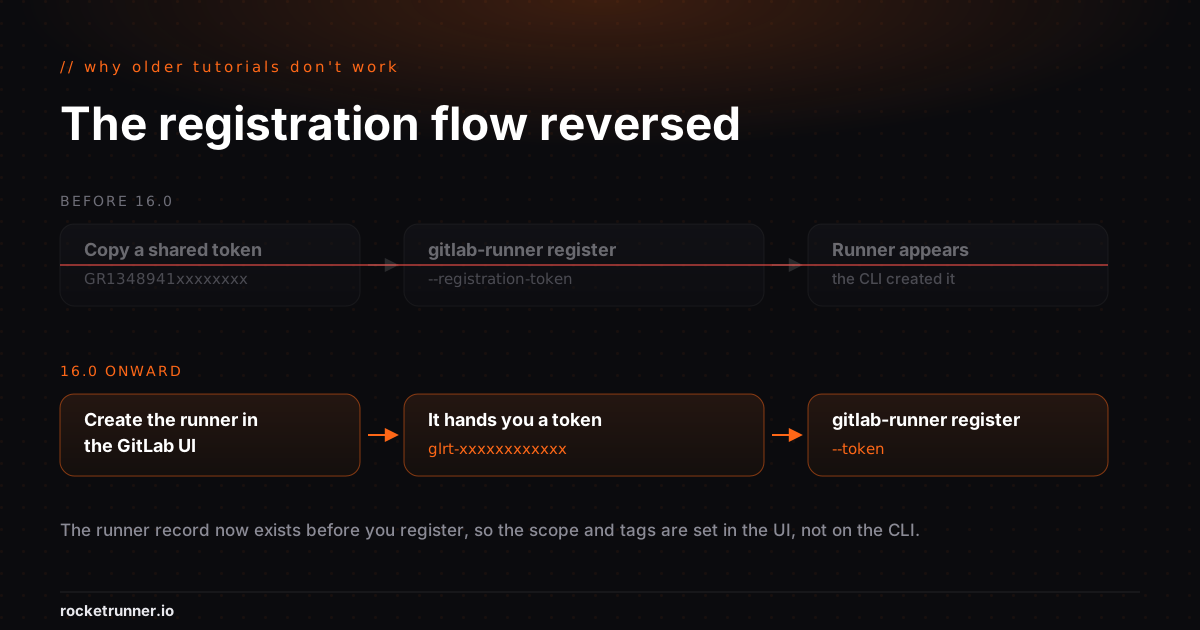
One thing to know before you start, because it invalidates most of the tutorials
you will find: the registration flow reversed in GitLab 16.0. You now create
the runner in the GitLab UI first and register with the authentication token it
gives you, rather than pasting a shared registration token into
gitlab-runner register. If a guide tells you to copy a GR1348941... token
from the runners page and pass it as --registration-token, it predates the
change. Check your own version with gitlab-rake gitlab:env:info, since exactly
when the legacy path stops working depends on which release you are on.
Step 1: Pick a machine
The runner does not go on your GitLab server. It can, and every tutorial that does it that way works fine right up until a heavy build starves your instance of memory and takes GitLab down with it.
Use a separate machine. Two cores and 4GB of RAM handles most single-project workloads. Anything doing container builds or a large test suite wants four cores and 8GB.
It needs outbound network access to your GitLab instance. It does not need to be reachable from the internet itself, because the runner polls out rather than being called in.
Step 2: Install GitLab Runner
On Debian or Ubuntu:
curl -L "https://packages.gitlab.com/install/repositories/runner/gitlab-runner/script.deb.sh" | sudo bash
sudo apt-get install gitlab-runnerOn RHEL, Rocky, or Alma:
curl -L "https://packages.gitlab.com/install/repositories/runner/gitlab-runner/script.rpm.sh" | sudo bash
sudo yum install gitlab-runner
Keep the runner's minor version at or below your GitLab instance's. A runner newer than the instance is not a supported combination and fails in ways that are unpleasant to diagnose.
If you plan to use the Docker executor, install Docker too, and confirm the
gitlab-runner user can reach the daemon:
sudo usermod -aG docker gitlab-runner
sudo -u gitlab-runner docker info
If that second command prints daemon information, you are fine. If it prints a permission error, the group change has not taken effect yet and a restart of the runner service will sort it.
Step 3: Create the runner in GitLab first
This is the part that reversed. You now create the runner record in the GitLab UI, and it gives you an authentication token to register with.
Decide the scope first, because it cannot be changed afterwards:
- Instance runner (Admin Area → CI/CD → Runners → New instance runner) is available to every project on the instance.
- Group runner (group → Settings → CI/CD → Runners) serves every project in that group.
- Project runner (project → Settings → CI/CD → Runners) serves one project.
Fill in the tags. This matters more than it looks: if you tick "Run untagged
jobs", the runner picks up anything; if you do not, it only runs jobs whose
tags: match. A runner with tags and no untagged flag, paired with jobs that
specify no tags, produces a stuck pipeline and a confusing afternoon.
Save it, and GitLab shows you a token beginning glrt-. Copy it now. It is
shown once.
Step 4: Register
sudo gitlab-runner register \
  --non-interactive \
  --url "https://gitlab.example.com" \
  --token "glrt-XXXXXXXXXXXXXXXXXXXX" \
  --executor "docker" \
  --docker-image "alpine:latest" \
  --description "docker-runner-01"
Use the URL exactly as your instance serves it, with https and no trailing
path. A mismatch here is the single most common cause of a runner that registers
and then never picks up a job.
Confirm it took:
sudo gitlab-runner verify
sudo gitlab-runner list
Then check the runners page in GitLab. The runner should appear with a green indicator within a minute or so.
Step 5: Choose the executor deliberately
The --executor flag is the decision with the longest tail.
Docker is the right default. Every job runs in a fresh container, so a job
cannot leave state behind for the next one. You set a default image and
.gitlab-ci.yml can override it per job.
Shell runs jobs directly on the host as the gitlab-runner user. It is
simple and it is the source of a large share of "works on my machine, fails in
CI" problems, because state accumulates on the host between jobs. Use it when
you need direct hardware access and you understand what you are accepting.
Kubernetes creates a pod per job. Correct at scale, considerable setup.
Docker Machine autoscales VMs on demand. Note that Docker Machine itself is deprecated upstream; GitLab maintains a fork, but it is no longer where new work is going.
Step 6: Prove it works
Commit a trivial pipeline:
test-runner:
  script:
    - echo "picked up by $CI_RUNNER_DESCRIPTION"
If it runs, you are done. If it sits pending, work through these in order:
- Tags. Does the job specify tags the runner does not have? Does the runner refuse untagged jobs while the job has none? This is the first thing to check because it is the most common.
- URL mismatch. Compare the
urlin/etc/gitlab-runner/config.tomlagainst your instance's actual external URL, character for character. - Runner never contacted the instance. If the runners page says the runner
has never connected, the record exists but no process is polling. Check
sudo gitlab-runner statusandsudo journalctl -u gitlab-runner -n 50. - TLS. A self-signed or incomplete certificate chain stops the runner
connecting.
sudo gitlab-runner verifysurfaces this clearly. - Protected branches. A runner marked "protected" only runs jobs on protected branches, and your test branch probably is not one.
What this costs you afterwards
The install is an afternoon. The ownership is permanent, and it is worth naming before you commit to it.
Runner versions need to track your GitLab upgrades. Docker layers and build caches fill the disk, and the first symptom is usually a job failing for a reason that looks nothing like a full disk. The machine needs patching like any other server. And when someone leaves, the runner they set up is often the thing nobody documented.
For one runner serving one team, that is a fair trade. It stops being fair around the point where you are maintaining several, particularly if they belong to different clients and are supposed to stay isolated from each other.
If you would rather not own that, runners for self-hosted GitLab covers renting a dedicated single-tenant VM registered against your own instance, with the OAuth application living on your GitLab where you can revoke it yourself.
// Keep reading
Related posts
// gitlab
GitLab CE Comes Without a Runner: Why Nothing Executes Your Pipelines
Aug 12, 2026 · 6 min read
// gitlab
GitLab Omnibus Runner Setup: Same Box or Separate, and the Traps Either Way
Aug 10, 2026 · 5 min read
// gitlab
Docker Builds 3× Faster With a Persistent BuildKit Builder
Sep 3, 2026 · 3 min read